32

Air Dry Clay Christmas Ornaments 5 Different Ways (& A Craft Blog Hop!)

Hello and welcome, crafty friends! Today, I’m joining all the lovely ladies of the Canadian Christmas Craft Blog Hop where we are showcasing our best holiday craft ideas. (You’ll see links to all 20 ideas at the bottom of the post).  For my part, I’ll be showing you how to make Air Dry Clay Christmas Ornaments 5 Different Ways.  Using air dry clay is quick and easy and is the perfect craft to do with the kiddos.

Okay, let’s get started!

Learn how to make air dry clay Christmas ornaments 5 different ways in this quick and easy step-by-step tutorial. Decorate a tree or use them as gift tags. It's the perfect Christmas craft to do with the kiddos!

~ The following contains affiliate links at no extra cost to you. See my full disclosure policy here. ~

Basic Supplies Needed to Make Air Dry Clay Christmas Ornaments

  • air dry clay (I used FIMO in white)
  • wax (or parchment) paper + tape
  • rolling pin
  • cookie cutters
  • basic drinking straw
  • small jar filled with water
  • ribbon of choice (I used natural jute twine like this one or this one)

The following supplies are used in some of the ‘fancy’ designs that I’ll be showing you below and are, therefore, totally optional. These include:

  • a clay embossing set (I used this Walnut Hollow set)
  • gold glitter of your choice
  • small piece of greenery (real or synthetic)
  • brush & watercolours of choice
  • sand paper

Design #1:  Basic Star Shapes  

First, lay your wax paper on a surface and tape it down. This will prevent it from shifting around. The wax paper is a good choice so that the clay does not stick to the surface. Fill a small jar of water and keep it handy.

Use wax paper base to prevent air dry clay from sticking.

This is the air dry clay that I used (and highly recommend for this project). It is extremely pliable and very easy to use.

Open your air dry clay package and begin tearing off pieces.

Tear air dry clay from package.

The clay is very pliable in your hands, and is similar to silly puddy (if memory serves!).

Air dry clay pieces.

Combine pieces together with hands, ensuring that there are no air pockets.

Combine clay with hands.

Roll out the clay to whatever thickness you wish. Mine was about a quarter inch thick.

Roll out clay using rolling pin.

Taking your star-shaped cookie cutter, press into the clay.

Press cookie cutters into air dry clay.

Remove the excess clay.

Remove air dry clay excess.

To smooth out any edges, dip your finger in the jar of water and gently massage any rough edges away.

Smooth out rougher edges with water.

Next, taking your straw, bore a hole in each star created. Make sure it is big enough for the ribbon or twine you’ve chosen to use to hang your ornaments when ready.

Bore a hole at the top of the clay ornament

Set aside your stars and let dry according to the instructions on the packaging. 1-2 days is normally the recommended timeframe.

Design #2:  Glitter Stars

For this design, you’ll follow all the basic steps outlined above, but with a twist.

As before, combine any separate clay pieces into a lump using your hands. BUT, before rolling out the clay, add some glitter.

Add glitter to air dry clay.

Roll out the air dry clay as before.

Roll out clay using a rolling pin.

Press your chosen cookie cutter shape into the flattened glitter clay & remove excess.

Remove excess air dry clay.

As before, make a hole at the top of each air dry clay ornament with a straw.

Make a hole at the top of each ornament using a plastic straw.

Set aside to dry.

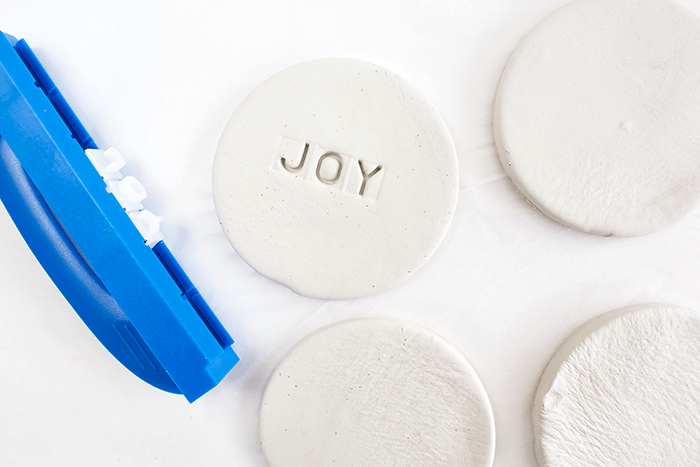
Design #3:  Embossed Wording

For this design, you’ll be adding words onto each ornament using a clay embossing tool. I used this one by Walnut Hollow:


Just as before, roll out your clay and using cookie cutters, create your shapes. Then remove the excess.

Remove excess clay.

The Walnut Hollow clay embossing kit comes with a handheld tool and removable plastic letters.

Use a clay embossing tool to create words.

Using the hand-held tool, slide the plastic letters onto it to create your festive word (remember, it will look backwards when facing you, so make sure to feed it onto the tool in the correct order).

Add letters to create word in clay embossing tool

Gently push the tool with the letters facing the clay ornament to create a word impression.

Gently push embossing tool into center of ornament to create an impression.

Continue in the same way, creating a different word per ornament.

Change up the letters in the clay embossing tool to create different words.

And as with the designs above, don’t forget to make a hole in each ornament before moving onto your next design.

Design #4:  Abstract Impression

Much like the design above, you’ll be making an impression into the clay, this time using a small piece of synthetic (or real) greenery.

First, roll out your clay and create your shapes. I chose to use Christmas trees for this design.

Create Christmas tree designs using cookie cutters.

Taking your greenery, press gently into the clay.

Gently press synthetic or real greenery into the Christmas tree clay ornaments.

Once removed, you’ll see an impression reminiscent of a tree in your ornament.

Abstract design using greenery - faux or real.

And, as before, using a straw, make a hole at the top of each ornament and set aside to dry.

Design #5:  Add Some Colour with Watercolours

If you love colour, then you may wish to experiment using paint on your ornaments. You can use acrylic, certainly, but for this design I chose to create a soft touch with watercolours.

As before, roll out your clay, create your shapes using cookie cutters and, if you wish, use the clay embossing tool to add words or some other design.

Add word impressions in these clay ornaments.

Then, simply add some watercolour, making sure to get into the creases of your clay impressions.

Add watercolours to each air dry clay ornament.

After Drying:  Add Ribbon or Twine

Once your air dry clay Christmas ornaments have fully dried (I let mine dry over a 2-day period, making sure to flip the ornaments over halfway between drying), add a simple ribbon or rustic jute twine to complete the look. Now you’re ready to use your ornaments 🙂

Add jute ribbon to clay ornaments for a rustic touch.

Here are each of the 5 air dry clay Christmas ornament designs ready for hanging!

Design #1

Air dry clay Christmas Ornaments.

Design #2

Glitter star Christmas clay ornaments.

Design #3

Embossed air dry clay Christmas ornaments.

Design #4

Christmas tree air dry clay ornament design.

Design #5

Watercolor clay Christmas ornament design.

You can use these to decorate a tree or make them into gift tags to add to your Christmas gifts.

If You’ve Never Used Air Dry Clay, Here Are Some Tips & Suggestions

1.  Storage:  Place any clay you’re not using back into the packaging or into an air-tight ziplock bag. It is best to use up all the clay within a couple of weeks.

2.  Drying Time:  As I mentioned earlier, let your ornaments dry 1-2 days, making sure to flip the pieces over halfway between drying. I dried mine for 2 days.

3.  Polish Edges:  Once dried, you can use sand paper to polish off any rough edges (unless you – like me – prefer a more natural, rustic look).

Air dry clay ornaments for Christmas, 5 different ways.

For more creative Christmas craft ideas, don’t forget to check out these gorgeous DIY’s from my talented Canadian blogging friends:

Canadian-Bloggers-Christmas-Hop-2017-collage

From left to right, top to bottom:

AKA Design | Vinyet Etc. | The DIY Mommy | A Pretty Life

Sustain My Craft Habit | A Pretty Fix | Making it in the Mountains | The Learner Observer

BrooklynBerryDesigns | Country Parent | Craftberry Bush | Amidst the Chaos

northstory | Life is a Party | Pink Little Notebook | hodge:podge

This Mamas Dance | Rambling Renovators | Suburble | PMQ for two (not shown)

Happy crafting 🙂


32 Comments

  • Reply
    Jo-Anna
    December 6, 2017 at 1:51 pm

    I love these! They’re such a pretty and simple ornament…so many decorating possibilities!

    • Reply
      Jelica
      December 6, 2017 at 6:21 pm

      Thanks Jo-Anna. I like the versatility of air dry clay 🙂

  • Reply
    Tara
    December 6, 2017 at 6:10 pm

    So these are fabulous! I can’t believe that I’ve never used air dry clay before. I’m going to have to change that!

    • Reply
      Jelica
      December 6, 2017 at 6:24 pm

      Thanks Tara! Clay is such a fun medium and the air dry version is so easy to craft with. I had so much fun making these ornaments 🙂

  • Reply
    Ashlea
    December 7, 2017 at 12:41 pm

    so pretty!

    • Reply
      Jelica
      December 7, 2017 at 10:00 pm

      Thank you Ashlea 🙂

  • Reply
    barbara
    December 8, 2017 at 12:24 am

    I have always wanted to try air drying clay. I love how these turned out! Beautiful

    • Reply
      Jelica
      December 11, 2017 at 6:46 pm

      Thanks so much Barbara!

  • Reply
    Michelle
    December 11, 2017 at 7:31 am

    These are all darling and I love the way the watercolors settled into the lettering. It gives it such a nice soft touch with a little bit of punch. I have to admit Fimo is one of my favorite air drying clays to work with too. We just struggle to find the white one here.

  • Reply
    Katerina
    December 11, 2017 at 9:49 am

    I like working with fimo too! I made some ornaments with a lace print but I really loved design #4! Great work!

  • Reply
    Laurie @ VinYet Etc.
    December 12, 2017 at 12:37 pm

    The possibilities are literally endless! I happen to have some of this clay, I ‘m going to have to try this with the kids, they will love it! Your tutorial is amazing by the way, beautiful blog my friend! And, I need to learn your weaving, my goal for 2018! xo

    • Reply
      Jelica
      December 12, 2017 at 5:05 pm

      You are so sweet, Laurie 🙂 The clay is definitely a fun craft supply to use with the kiddos. Fun and so pliable – the kids will love the texture of it, for sure. Take care my friend!

  • Reply
    Dannyelle
    December 12, 2017 at 2:46 pm

    These are adorable and I love how you made a bunch of different ones. Great ideas!

    • Reply
      Jelica
      December 12, 2017 at 5:03 pm

      Thanks Dannyelle! I thought I might as well create a few versions while I had all the supplies available. It was so much fun playing around with various designs and shapes.

  • Reply
    Sabrina @ Pink Little Notebook
    December 13, 2017 at 9:12 am

    I’ve always wanted to try out clay. Thanks for all the tips, these ornaments are gorgeous!

    • Reply
      Jelica
      December 14, 2017 at 8:38 pm

      Thanks Sabrina! I really loved using this material. It’s easy to handle and very pliable and, well, it’s just a whole lot of fun to use 🙂

  • Reply
    Kristy
    December 13, 2017 at 2:58 pm

    These are adorable! I made some with my 1 year old last Christmas and the certainly didn’t come out as beautiful as yours. But, it’s a memory I won’t forget. Happy Holidays

  • Reply
    Mary
    December 15, 2017 at 10:42 am

    I honestly wouldn’t know which one to pick they are all adorable. I have only used air dry clay once to make a dragon egg with my son. I guess I’ll have to correct that now.

  • Reply
    Katrin
    December 16, 2017 at 11:35 am

    I love white clay ornaments and all these versions are super beautiful Jelica!

  • Reply
    Florence @ VintageSouthernPicks
    December 19, 2017 at 11:08 am

    I love these simple white ornaments Jelica, and they would look so nice against the backdrop of a green tree. You made your tutorial easy, which I like, and I can’t wait to try this! I noticed you said to use up the clay within 2 weeks. What if you haven’t used it in that length of time? Wonder if there’s a way to soften it back up again? Anyway, I love the designs. Glad to have the suggestion of embedding the glitter within the clay rather than sprinkling on top…seems easier.

  • Reply
    Reg.
    December 21, 2017 at 11:03 am

    Such a beautiful craft! I love the greenery impressions.

    • Reply
      Jelica
      December 30, 2017 at 10:57 am

      Thank you Reg!

  • Reply
    Francesca
    November 15, 2018 at 2:54 am

    Oh my goodness, these are all so beautiful! I found you via Kim’s blog (barefootbudgeting.com) and I’m so glad I did. I went ahead and pinned this because I want to make sure to come back and follow your instructions. Love all your creations ♥

    • Reply
      Jelica
      November 20, 2018 at 8:01 am

      Thanks Francesca! I had so much fun creating these ornaments that day. It felt a little like creative baking 🙂

  • Reply
    Sara
    December 13, 2018 at 12:47 am

    I had my sons class make these but I forgot to have them put a hole in if at the top. WHAT DO I DO?

    • Reply
      Jelica
      January 15, 2019 at 7:15 pm

      Hi Sarah, Hopefully you found a solution in time for Christmas. If not, next time I might simply use glue to attach twine to the piece (for a quick fix) or even wrap the entire ornament with twine several times, in various directions, thus creating a pattern and then secure it with a knot along the edge and then with the ends dangling, simply tie a knot at the top to create the loop. Hope you managed to resolve it 🙂

  • Reply
    Olga
    November 16, 2019 at 1:54 pm

    Hi Jelica,
    Can you please advise how many ornaments are made from one clay package?

    • Reply
      Jelica
      November 17, 2019 at 8:06 pm

      Hi Olga: It will all depend on how large and how thick each of your ornaments are going to be. I used up most of the package when I created all of these ornaments (25 in all), each about 1/4 inch (or less) thick. Some were just a couple of inches in diameter. Hope this helps 🙂

  • Reply
    Jen P
    June 22, 2020 at 9:48 pm

    Hi Jelica – That’s great that this package makes approx. 25 ornaments! Regarding the circle ones, what is the diameter of those ornaments? They look like they’re 3″ in diameter. If so, how many letters can you fit? I believe 5 may be the most letters on the 3″ circular ones. Please let me know, thank you! These are wonderful.

    • Reply
      Jelica
      July 17, 2020 at 6:06 pm

      Hi Jen, Yes, these are about 3 inches and yes, about 5 letters can fit across using the kit I have 🙂

  • Reply
    Andrea
    August 21, 2020 at 7:32 pm

    So cute! Do you have to seal them at all after they dry?

  • Leave a Reply