I’m back with another weaving post today. This time, I’m sharing how to make these DIY woven bookmarks. It’s the perfect project for beginners.

Start Small
One of the best ways to practice the art of weaving is to create a lot of small weavings. Better to make our mistakes on a small scale than on a large scale.
(In case you missed it, you’ll want to check out these other mini weaving tutorials: DIY Woven Coasters, DIY Mini Framed Weaving, and 3 Mini Weavings, 2 Techniques).
Oh, I know what you’re thinking: “But I want to make dynamic, intricate wall weavings, like the ones I see on Pinterest!” Woa now. As Yoda says, “patience you must have.” Experimenting on small weavings first is going to help you discover all the little tricks and techniques needed for the large-scale wall hangings that you love.
Practice Shapes
One of the other advantages of starting small is that you can test out how to make shapes in your weavings. When you first start out, creating basic squares, triangles or circles can seem like a bit of a mystery. But don’t worry, in this tutorial, you’ll see just how easy it can be.
So, if you are up for practicing shapes – or just want to add these cute bookmarks to your collection – then you will love this simple DIY woven bookmarks tutorial.
MATERIALS You Will Need To Make These DIY Woven Bookmarks:

- yarn (I recommend no thicker than worsted weight ‘3’)
- weaving needle
- cardboard loom
- scissors
- small circular lid (not pictured)
- pen or chalk pencil (not pictured)
(optional: iron, ironing board, Mod Podge, foam brush)
STEPS
Step 1: Make A Cardboard Loom
I used the same 10″ X 5″ loom I had for my DIY Woven Coasters post.

I cut 1/5 inch slits across the top and bottom of the cardboard. These slits are what will hold your threads in place.
(See the full tutorial on how to make this cardboard loom here).
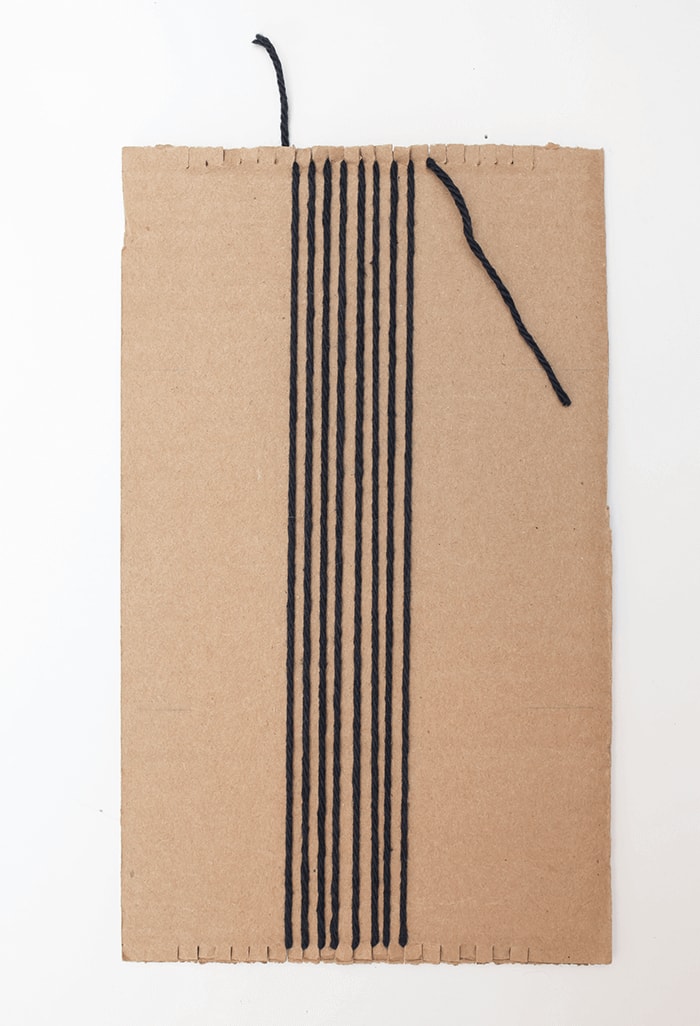
Step 2: Warp Your Loom
The ‘warp’ is a weaving term that refers to the vertical threads of a weaving (see my Introduction to Weaving for a brief discussion on weaving terms). Every weaving starts this way. There are 8 warp threads used for each bookmark.
To create your warp, begin by tucking the top end of your yarn into one of the slits across the top.

Next, pull the warp thread down and tuck into the slit directly below. Wrap the thread around the back side of the cardboard until you reach the top. Then tuck the thread into the slit to the right.

Continue wrapping around the loom until you have 8 visible warp threads.
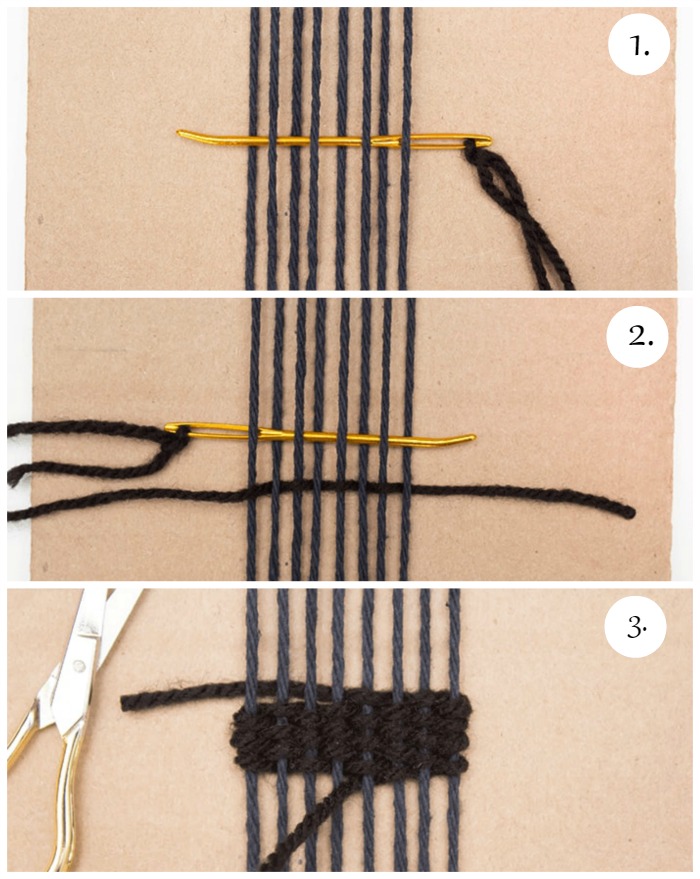
Step 3: Plain Weave
For all 3 bookmarks, you will be using the ‘plain’ (or ‘tabby’) weave stitch. It is the simplest kind there is. (For a detailed explanation of the tabby or plain weave technique, see my Introduction To Weaving, Part 2 or my DIY Mini Framed Weaving tutorial).
Begin by threading your needle. Weave the yarn into the warp threads by going over and under every other one. Continue making rows, four to five, for the base.
Step 4: Creating Shapes
ANGLES
To create your first angle, you will be using the same ‘plain’ weaving technique. But instead of weaving all the way across, you will stop at different warp threads along the way to create your angles as you see below.

To create this look, begin by weaving one colour at a time. Here is a sample of the first completed block of colour.

To create angles, you simply weave around 1 additional warp thread at a time. In this particular case, I wove 2 rows of equal length before adding a warp thread for a more gradual angle.
For this bookmark, there are 3 angled blocks of colour. Follow along below as I begin creating the second angled sequence of stitches.
Start by weaving over a single warp thread, twice, as seen in the picture below.

Then, weave the next two rows, this time using 2 warp strands.

Continue the pattern of adding 1 more warp strand for every two rows completed. For this bookmark, I created 12 rows for each angled block.

To create the third angle in your bookmark, repeat the process. Finish off the top end by using plain weave.

(Don’t worry about the loose yarn threads. You will weave these into the back side at the end. For now, just be sure to leave at least 3-4 inches of loose thread).
Next, taking another colour of yarn, fill in the rows of empty (or ‘negative’) space. I used the same thickness for the white yarn so that the rows appear to match up, but you don’t have to.


(I’ll show you how to remove the bookmark from the loom later. For now, let’s continue learning how to create shapes.)
SQUARES
Because weavings are made up of horizontal and vertical threads, creating squares is a far easier process.
Like the first bookmark, this one is divided into 3 sections. In this case, each section is itself made up of 3 rectangular shapes (as pictured below). For every rectangle created, there are 4 rows of weaving – can you spot the rows?

Let’s have a closer look at the first section.

For the first rectangle within the first section, use 2 warp threads. Weave 4 rows.
For the second block, use 4 warp threads. Weave the next 4 rows.
For the third block, use 6 threads. Weave the final 4 rows.
Repeat the process for each section. Your bookmark should look something like this:

As with the first bookmark, fill in the negative space with white or other colour of choice.

Finish off the look at the top with black yarn or other colour of choice.

HALF CIRCLES
Circular shapes are not very difficult to make. But given the nature of a weaving, which consists of vertical and horizontal yarn, circles are never ‘perfectly’ circular. They often appear pixelated and that’s okay.

(Tip: There are certain ‘tricks’ that can be learned to smooth out a circle, including the ‘twining’ technique, but for this project I didn’t want to make things too complicated. If you’d like to check out what this is, click here for a great little tutorial by Kate from The Weaving Loom blog)
To create your half circles for this DIY bookmark, you will need something circular, like a cap or lid. Trace the half circle by lightly marking the warp threads using a pen or chalk pencil.

Then simply fill in the circle by weaving rows. Do not worry about symmetry here. Simply weave across until you reach the mark left on the warp thread.

Continue the process by weaving 2 more half circles and then filling in the negative space with white yarn. Then cap off the top end with black yarn.

Step 5: Remove DIY Woven Bookmarks From the Loom
Cut the the warp threads on the back side of the loom.

Gently remove the bookmark from the loom.

Tie the ends, two at a time.
 Tip: These DIY woven bookmarks will feel fragile in your hands. Careful not to pull too tightly when tying the threads, otherwise you might risk bunching up the weaving, much like a draw string on a bag.
As for any loose threads along the side, weave those into the back side and cut off the excess.

Step 6: Optional -> Prep Bookmarks
Unless the yarn you use is especially thin, your DIY woven bookmarks may make your book bulge out a bit. Even my size 3 worsted weight yarn required a bit of prep work to flatten them out a bit.
First, gently iron each of your DIY woven bookmarks on the lowest setting. Press, do not drag the iron across.

Once ironed, the yarn will flatten out a bit.
Since the bookmarks are made of yarn, they will be soft and floppy. If you want them stiffened, then simply apply some Mod Podge.

Dip a foam brush into the Mod Podge and wipe off all the excess. Then very gently dab each bookmark, front and back.

Since the purpose is not to seal, but stiffen the bookmark, you don’t need to cover every little spot.
The Mod Podge will be white, but don’t worry, it becomes translucent as it dries.
Tip: The Mod Podge will bind the yarn together, so before it dries take a toothpick and gently separate the rows.
Ready For Use
Once dried, you’ll have the sweetest little bookmarks, ready for use!


As I mentioned at the top of this post, practicing your weaving techniques on smaller pieces is one of the best ways to see what works and what doesn’t.

And it’s a darn good way to try multiple techniques in a short period of time.

Plus, you’ll have some cute little projects to do with the kiddos!
Happy weaving!

If you enjoyed this DIY, then you may also want to check out the following tutorials:


For more craft, decor, and style tips from just some of my favourite bloggers, check out the following link parties: Create~Bake~Make, Mad Skills, Happiness is Homemade, Craft Schooling Sunday, Sweet Inspiration, Pretty Pintastic Party and Welcome Home Wednesdays.


Leave a Reply