When I first set out to figure out how to organize a small desk with no drawers, I really had no idea how challenging it would be. My workspace was a very basic IKEA desk consisting of a tabletop attached to cubbies with zero built-in drawers. Barely enough room to fit everything I needed. But since this tiny setup had to support not just one job, but three – my day job, my blog business, and my Etsy shop – I had to get creative!
Even with such a tiny space sans drawers, I’ve managed to maintain a highly functional, clutter-free home office setup that supports all three roles. And the best part? My desktop stays completely clear of everything but my laptop (well, most of the time!).
In this post, I’ll walk you through my exact system – including the storage solutions I actually use. If you’re looking for small desk organization ideas that work in real life (not just on Pinterest), here’s how I made it work, and how you can, too.

~The following contains affiliate links for your shopping convenience. Should you choose to purchase through them, this blog makes a small commission at no extra cost to you. See my disclosure policy here.~
HOW TO ORGANIZE A SMALL DESK WITH NO DRAWERS
But First: My Basic Set Up
Before diving into my specific organization tips and storage solutions, I want to give you a quick look at my basic set up:

My workstation is a simple IKEA tabletop paired with a vertical cube storage unit that has eight cubbies. It is set up in my craft studio sandwiched between two sizeable IKEA Kallax cube storage systems where I store my craft supplies:

The actual workspace is quite small, the tabletop measuring just 23.5 X 47 inches. Yes, it’s THAT small. It definitely appeals to my minimalist heart, but it also makes storing essential office supplies and paperwork a bit of a puzzle. Keeping things both functional and clutter-free has been a challenge I’ve had to get creative with.
Shopping Links
Find similar workstations online, below – click the arrow to scroll through:

The office chair I use is this ergonomic beauty (by the Brand: KERDOM).

This chair’s got a breathable mesh back, smooth-rolling wheels, and a super comfy, extra-thick cushion that strikes the perfect balance between soft and supportive. The height adjusts, the arms flip up and out of the way – it works well on so many levels.
My exact chair is a bit difficult to find now (by the brand, KERDOM), but there are so many similar options online these days.
Shopping Links
Find other office chairs with wheels here – click the arrow to scroll through:
Okay! Now that you’ve got a sense of the basic setup, here’s how I turned this small office into an organized, high-functioning spot – including the full list of furniture, supplies, hacks, and ideas to help you upgrade your current setup or plan a new one from scratch.
1. Keeping the Tabletop Clear (yes, even with 3 jobs)

My number one rule: nothing extraneous lives on the desktop at the end of my work day (except perhaps a laptop).

I work entirely from two primary laptops – my personal/business laptop and my day job laptop – so keeping the table clear at the end of my work day is not all that difficult to achieve. It helps me easily switch between jobs and keeps visual clutter to a minimum. Whether I’m in day-job mode, writing blog posts, or printing Etsy shipping labels, my tabletop remains free and clear of all but the essentials.

This is possible, in part, because all my essential supplies are stored around the desk – not on it (more on that later).
That’s the key to keeping my space tidy and organized.
OTHER OPTIONS
BUT what if you NEED to keep some things on your tabletop like a monitor and a few basic office essentials? Here are a few things I would recommend:
1. Add a Monitor Stand
Adding a monitor stand — like this one or any of the options above — allows you to elevate your computer monitor on your desk, while freeing up space underneath for things like files or other supplies.
2. Add a Keyboard Tray
Adding a keyboard tray that tucks under your desk (like the ones above or any of these ones) is the perfect small-space solution. Mount it just under the table, and simply slide it out when needed or tuck it away when not in use.
3. Add Small Desktop Storage/Organizers
Adding a small desktop organizer (like the ones above, this one or this one) is a great way to add storage without taking up much space. It’s perfect for paperclips, sticky notes, essential paperwork, and other small items.
4. Add a Paper Tray (or two)
Adding stackable paper trays (like the ones above, these ones or any of these) is an easy way to keep clutter under control while maintaining a clean, organized workspace. Use them as an inbox and outbox or to store printer paper and notepads for quick access.
2. Stackable Clear Plastic Drawers Under My Desk
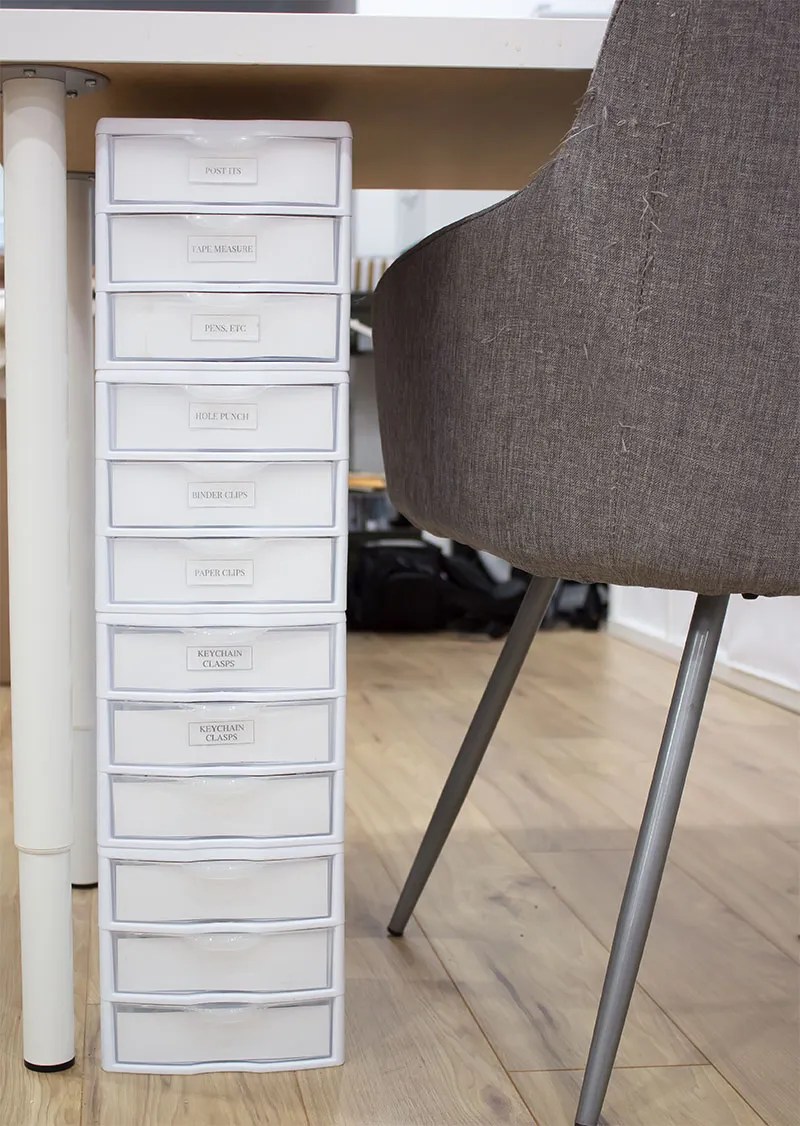
Since my desk did not come with built-in drawers I decided to create my own.
Under my desk, I use stackable, clear plastic drawers to organize small, lightweight items. I love how easy they are to move and they store a surprising number of supplies. Mine are 3-drawer systems that can be stacked as tall as you need them to be.
I set up 2 towers – one on either side of my table – each comprised of four sets of 3-drawer units.

Here’s how I use them:
- Day Job/Blog/Etsy Shop: pens, markers, highlighters, sticky notes, basic office supplies
- Etsy Shop: small shipping supplies, samplers, craft supplies
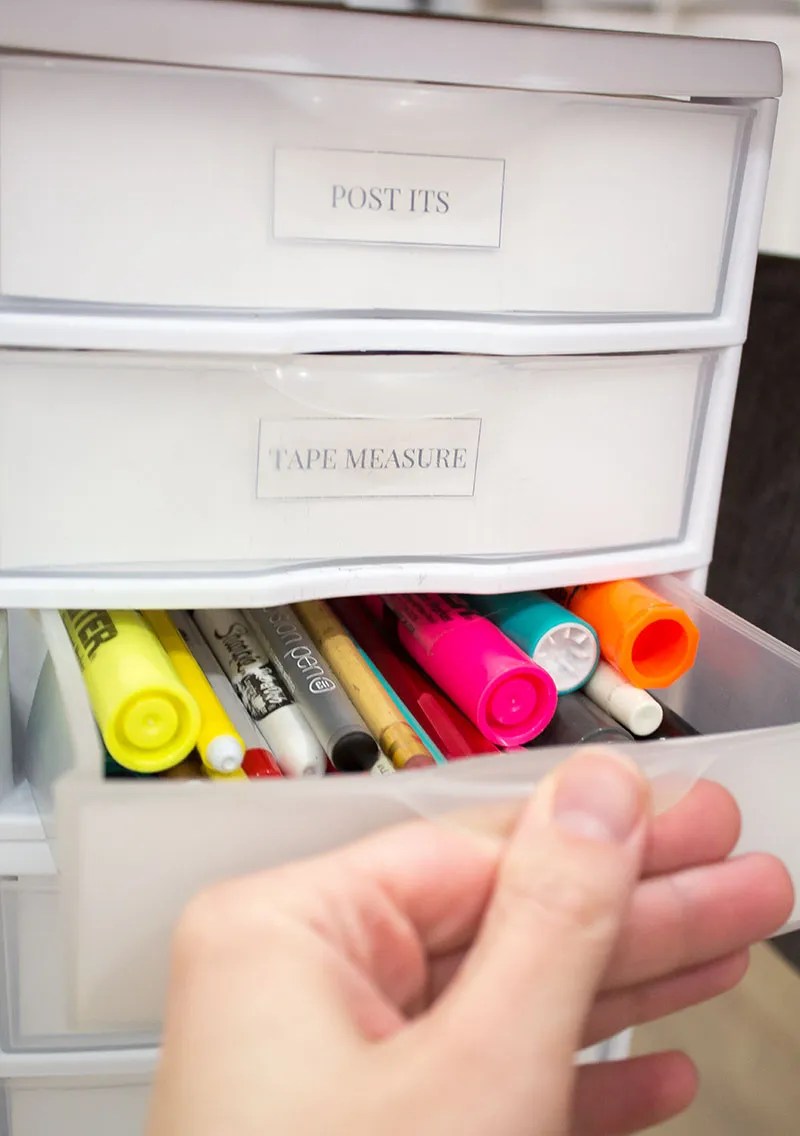

I’ve also labeled each drawer with basic craft paper (a little thicker than normal printing paper) so that I can identify everything at a glance.

As someone who really hates running out of space, I went ahead and purchased a few extra drawers, keeping them empty for extra storage and overflow, as needed.
NOTE: While I love these stackable units, keep in mind that the taller the stack, the ‘wobblier’ it gets. These are plastic and lightweight, after all.

This is one of the easiest ways I’ve found to organize my small desk with no drawers. Just this one thing – adding my own drawer system underneath – was a total gamechanger!
Shopping Links
Here some other stackable options:
3. Maximize Vertical Storage – My Cube Storage Essentials

The vertical cube storage that came with this IKEA workstation was an absolute must for me. It allowed me to store office essentials while keeping my tabletop clear of clutter. But this only worked if I used every square inch of space available in each cubby – that’s the secret sauce to maximizing their use.
This is how I maximized this vertical space.
Top 4 Cubbies:
In my top 4 cubbies, I use these stackable paper trays – lots and LOTS of them!

These paper trays hold a lot of paper products and so much more:
- Day Job: important notes, forms
- Blog/Etsy Shop: receipts, bookkeeping, shipping stickers and cards, small kitchen scale (to weigh items before printing shipping labels), measuring tape
- Multi-Use Essentials: Stapler, tape dispenser, hole punch, calculator, charger.
By stacking lots of trays – and maximizing the vertical space available – I have layered storage, easily accessed, without having to sort through piles of papers. Everything stays neat and easy to grab.
As a visual person, I always know where everything is, at a glance.

These trays are part of the “Amazon Basics” line – easily one of the best affordable brands out there. In fact, I regularly purchased their printer paper, file folders, and note pads, well before I found the trays.
BEST decision I made to keep my paperwork tidy.
The trays are ‘standard’ size and perfectly suited to fit into the IKEA Kallax cubbies (if you are thinking of doing the same in your office).
Shopping Links
For other options, scroll through the links here:
Bottom 4 Cubbies:
In the bottom 4 cubbies, I store random supplies using a mix of fabric bins and vertical file organizers for least-used items, including:
- Extra file folders and labels
- Oldest blog receipts


The precise fabric bins I used were purchased from Amazon (visit the Canadian Site or the US site here). At the time of purchase, they were slightly more affordable than the IKEA fabric bins made specifically for these cubbies.
Shopping Links
For more cube storage options, scroll through the following links:
I’ve had my black plastic vertical file organizers for ages – they’re quite basic. You can find plenty of other vertical file organizers online that suit your style and taste.
OTHER OPTIONS
If you don’t like IKEA’s cube storage systems, consider using a other cube organizers.
But, if adding more furniture just isn’t in the cards, then consider tabletop shelf risers (like these or these or these) to mimic the same/similar function, but on a small scale.
4. A Shared Metal Cabinet for Paperwork

While my cubbies get a lot of use, I still need additional space for other paper and office supplies. This old (and rusted) metal cabinet – which I painted with white chalk paint (so easy – no prep required!) to coordinate with the rest of my space – serves this purpose.
Below is a photo of my craft studio just a few short years ago – you can see the cabinet tucked away on the far left:

While I keep an HP Wireless Printer on top, in the cabinet drawers I store paperwork I don’t need on a daily basis:
- Blog/Etsy Shop: Monthly statements, invoices and receipts, overflow office supplies (e.g., printer paper, notepads)
- Day Job: Reference files, forms, training notes, etc
My husband also shares this cabinet, using the bottom half for his paperwork overflow. It’s a perfect archive that keeps our workspaces a little neater.

TIP: These days, you can find used office furniture locally, but also online on Craigslist, Kijiji, and Facebook Marketplace. But, if you’re in the market for a new tall office cabinet, I’ve got some options, below:
Shopping Links
Scroll through for more options:
OTHER OPTIONS
If you don’t need a tall cabinet, but do require a little extra paper storage, try using a rolling cart, a compact filing trolley, or even a a few more stackable letter boxes on a shelf.
The key here is storing older paperwork out of your everyday zone, while keeping it easy to access.
5. Multi-Device Charging Station & Cord Control

One of the most useful additions to my desk setup was adding this sizeable power bar and surge protector – especially useful when running multiple devices.
(*Tessan is the brand I have – which offers MULTIPLE options – but depending on your needs you can find many other alternatives online.)
My husband found this one for me – and it was just perfect for my purposes. It includes:
- 8 standard outlets
- 3 USB ports
- Built-in surge protector
- 6-foot extension cord
Plenty of outlets means I can keep everything plugged in – typically, 2 laptops, a phone charger, a small space heater, and more – all in one spot.

A small detail but one I thought I’d mention: one of the hero features is the flat plug with a slim cord-drop:

Unlike bulky plugs, this one lies nearly flat against the wall, so the cord runs straight down. That low-profile design made it possible to slide the plug behind my other cubbies in the room.
If you need to fit a plug into a REALLY TIGHT SPACE, this one will do the trick. Just that little detail – a flat plug – helps keep everything safe, tidy, and out of the way.
Final Thoughts: Small Desk, Big Functionality
Even without a traditional desk with drawers, I’ve been able to organize my small desk to help me manage three different jobs efficiently. The secret? Maximize every inch of space – under my desk, inside each cubby, and even with additional storage like an old metal cabinet.
If you’re workspace is feeling a bit cramped or chaotic, I hope that sharing how I’ve organized my workspace has given you an idea or two to help you organize your home office. It may take a little extra time, but be patient and make adjustments along the way, just as I did.
After all, a home office isn’t a one-time project – it’s an evolving space that grows with your needs.
Happy organizing,
![]()
PIN NOW & SAVE FOR LATER
![]()


Leave a Reply