So, you’ve just started weaving (or have for a while) and you love it! But, you are OVERWHELMED with where to purchase some of the most basic weaving tools and supplies. When you do a google search, you are brought to sites for every type of weaving: rigid heddle loom weaving, square loom weaving, stick weaving, and everything in between. You have just discovered that the world of weaving is much bigger than you thought!
I know exactly how you feel. That was my experience when I first started weaving.
This was, in part, because I had no one to ask about weaving. I personally did not know a single weaver. None. Oh, I could shake a stick at a dozen or so knitters, crocheters, and even some who could embroider (including myself), but to find a weaver? Well, that was like looking for a needle in very large, super enormous yarn stack 😉
But now, after a little time and experience behind me, I’ve finally managed to sort out my go-to tools and supplies and – most importantly – where to find them.

If you are spinning your wheels looking for your weaving essentials – or you have been weaving for some time and want to expand your repertoire of go-to tools and materials – then let me share with you some of my favourite budget-friendly weaving supplies and where to find them.
(Tip: When doing any search for weaving tools and materials, using the correct search terms will make a world of difference. In the list below, I’ve used the terms that have provided me with the best results).
~This post contains affiliate links. See my full disclosure policy here.~
1. FRAME LOOM

The type of loom I use for my wall weavings is called a Frame Loom. That’s because it is rectangular in shape, just like a picture frame. There are 2 types of frame looms that I use:
Lap Loom
The first is called a Lap Loom. This type of frame loom is small in size, about 14 inches wide (with 12 inches of actual workable weaving space to use). Small enough to fit in your lap.
To begin your search, you can start with these budget-friendly lap looms in 2 different sizes and price-points: 14.5″ Loom (budget-friendly version) and 14″ Loom (hand-crafted).
Standing Loom
Sometimes described as a Frame Loom with Stand, standing looms are slightly larger than lap looms and come equipped with ‘arms.’ These allow you to prop your loom on a table by extending the arms back, giving the loom support. You can then sit comfortably at a table and weave.
You can find 2 versions here: 20″ Standing Loom (budget-friendly version) and 18″ Standing Loom (hand-crafted).
Note: There are 3 variations of frame looms that you will see when doing your online search. One is referred to as a Peg Loom. This type has pegs along the bottom and top of the loom. The second variation is referred to as a Notched Loom. This type has notches along the top and bottom of the loom. The third variation is called a Tabbed Loom. This type has ‘tabs’ that stick out of the top and the bottom of the loom. See these useful videos on warping these varieties of framed looms:
2. TAPESTRY NEEDLE

Tapestry needles also come in a few different shapes and sizes (as you can see from my collection above). You really only need 1 of these essential weaving tools to start, but it is always useful to have at least 2 or 3 types if you find yourself really getting into the art of wall weaving.
Straight & Small Weaving Needle
When I first started weaving, I used a small, 3-inch plastic needle with a large eye and blunt tip (perfect for kids 😉 and yet I still use it). The large eye of the needle allows me to use a wide range of yarns with different ‘weights’ or thicknesses.
For an inexpensive, beginner-friendly plastic weaving needle, try this inexpensive selection at The Unusual Pear on Etsy.
Bent Weaving Needle
Once you get used to weaving, you will want to purchase a bent weaving needle – a must in your weaving tools arsenal. Getting my first bent-tip needle was an absolute game changer! It made my weaving time go smoother and just a little bit faster. Even though I love how weaving helps slow things down in my life, sometimes it felt a little too slow, if you know what I mean. The benefit of having a tapestry needle that is bent at the tip is that it allows you to get under your warp threads with far greater ease.
I personally use this bent weaving needle and absolutely love it!
Long Weaving Needle
One of my latest purchases has been this long weaving needle. It is 5 inches long and, like the bent needle, it speeds up the process of weaving by getting you across your warp a lot quicker. I can’t say enough about it – it is among my favourite weaving tools!
3. WARP YARN

Cotton Yarn
You can use virtually any type of yarn to create your warp – truly. But perhaps the one that most weavers use over any other is cotton – and with good reason. Cotton is soft and pliable, yet sturdy and strong. This combination makes it the perfect yarn to use to create your warp.
White or Cream – The Basics
Every weaver should have at least 1 white or cream cotton yarn in their arsenal. I recommend trying Lily Sugar n’ Cream Yarn in white and in cream. I have both.
Other Colours
If you already have white or cream cotton warping yarns, then you will probably want to experiment with colour. There is something so interesting about using contrasting colours in your warp threads. You can find a variety of colour options in weaver Maryanne Moodie’s Etsy Shop.
Other Varieties
All things being equal, I have also had good results using other yarns to create my warp, including inexpensive acylic, hemp and bamboo – a couple of projects of which I have shared on this blog (I used acrylic yarn for these DIY Woven Coasters and hemp yarn for this DIY Woven Pillow). All of these varieties can easily be found at any local craft store and online stores, including HobbyCraft, Hobby Lobby, Michaels, and CraftOnline.
4. SHED STICK
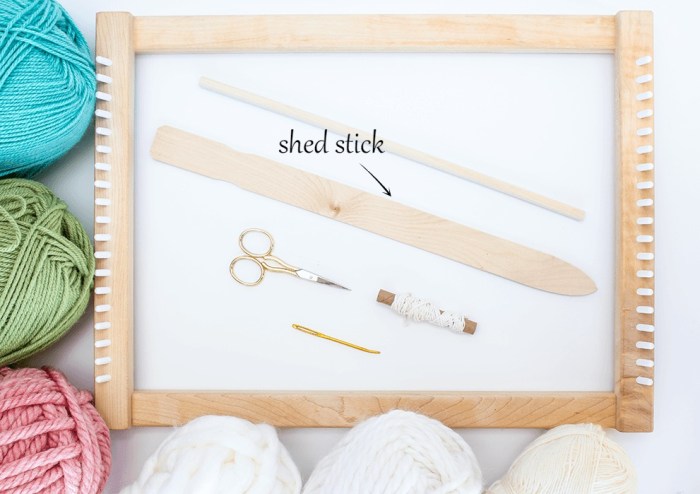
A shed stick can be useful in a couple of important ways.
First, it can be woven into the warp, turned on its side, thus making space for roving or for pulling yarn all the way across your warp without using a needle. (See how I used my shed stick in An Introduction To Weaving, Part 2).
Second, a shed stick can be woven along the bottom before starting a weaving. The shed stick creates a good foundation on which to push down your weaving stitches to keep the weaving nice and straight (see how I did this here: 3 Mini Weavings, 2 Techniques).
There are a wide variety of sizes and materials used to create basic shed sticks that you can find on Etsy.
When purchasing the appropriate length, make sure you find one that is wider than your warp so that it provides even support, end to end.
You can also improvise by using a long piece of cardboard for wider weavings or a ruler for narrower ones (as I did here).
5. WEAVING COMB
I have yet to purchase a proper weaving comb for the simple reason that I’ve not needed one. I have been using a kitchen fork for all of my weavings – and I do mean ALL. This includes weavings as simple as my DIY Woven Coasters to this very intricate Wavy Wall Weaving.
You can also use something as an inexpensive as a hair pick (like this one) or even a plastic hair brush. It’s true! I have watched video tutorials where weavers have used both.
But, if you, like me, would like to get a proper weaving comb at some point, then let me refer you to those that have made my short list:
- 6-Inch Weaving Comb
- 12-Inch Weaving Comb
- Tiny Weaving Comb (for those small weavings)
- 10-Tooth Comb With Handle
6. SCISSORS

There are 2 types of scissors I use when I weave. I often use one over the other, depending on the size and type of weaving, and sometimes both.
Regular Kitchen or Craft Scissors
Regular kitchen or craft scissors are perfectly suitable. They are great to have on hand when cutting thick roving yarn, for instance, but can be used for any of your yarns. You’ll often see me using our kitchen scissors in my tutorials. They suit me just fine for most of my weaving projects.
Precision Scissors
I like using smaller, precision scissors, however, when working on small weavings or ones with finer threads. It makes it easier to get into narrow spots when needed. I use basic embroidery scissors like this pair.
But, really, there are loads of styles and colours to choose from, like this cute stork design or this elegant black bonsai pair.
7. WEAVING YARNS

The good news here is that yarn is available everywhere! And you can use just about any type, including acrylic (as a cheaper yarn, it’s great for beginners). Later, you’ll want to use wool or wool-blends, which are more durable. I have used a wide range of brands, including Red Heart, Lion Brand, Wool-Ease (another Lion Brand), Patons, and Bernat.
I shop online at Amazon and at big box craft stores like Michaels, but I also like to go to local shops that specialize in yarn products where I can find a variety of brands and styles. Local shops also provide an opportunity to speak to those who are more knowledgeable about yarn.
If you are a beginner, you may want to purchase small packs with assorted colours, like this one, this one, or this one. These are great, budget-friendly options.
Specialty and Art Yarns
Besides your local specialty yarn shop, you can find all sorts of specialty and art yarns online in a wide variety of places, including Knit Picks, We Are Knitters, Wool and The Gang, Miss Knit Yarns, Amazon, and Etsy. Just experiment and have fun!
8. DOWELS

Unfinished Wood
When you are ready to remove your weaving from the loom, you’ll need a dowel to weave through the loops along the top:

The most common dowel used for a wall weaving these days is a wood dowel, often unfinished so that the weaving can stand out. You can buy them in bulk on Amazon and then cut them down to size (at least 2-4 inches wider than your weaving). Or you can purchase a small pack like this one.
Other Varieties
Don’t limit yourself to unfinished wood. There are so many other dowels to choose from on Etsy, including copper and driftwood.
And if you really want to experiment, use decorative branches, embroidery hoops, or even try lucite dowels to up your style. You can find any of these products at any online craft store mentioned throughout this post.
ADDITIONAL RESOURCES
For those of you who have just started weaving or have been for a while now, the list above will become increasingly useful as you continue exploring the art of weaving.
But, if you are an absolute beginner you may also wish to consider the most budget-friendly option, which is to purchase a beginner’s weaving kit. That is precisely what I did when I first started weaving. The benefit of this is that you’ll have all the essentials included to get you started. I still use my kit loom and tapestry needle from time to time, so I would say it was definitely a worthwhile purchase for me.
If you are exploring kit options, here are a few you may wish to consider:
- Harrisville Designs 12″ Lap Loom Kit (peg loom) (this is the same brand I have and nearly identical to the kit I purchased)
Or you can consider these other selections:
- Beka 14″ Frame Loom Weaving Kit (notched loom)
- Beka 20″ Frame Loom Weaving Kit (notched loom)
- Beka 20″ Weaving Frame With Stand (notched loom)
- Proops Lilac Weaving Loom Board Frame (tab loom)
FINAL THOUGHTS
I hope this list of basic weaving tools and supplies has narrowed the gap to finding the materials you will need for your weavings. And if you are new to weaving, you may want to read through my Introduction To Weaving (In 2 Parts) – it’s FREE. In it, I take you step-by-step through the process of creating your first woven wall hanging. I also show you my weaving kit (similar to the Harrisville Design above), the tools I’m using, and some basic terminology.
I hope this list provides you with a solid introduction into the world of weaving tools and supplies. The links and online resources provided are a great starting point for anyone looking to narrow down their search or expand their repertoire.

I’ll be updating this post from time to time, so feel free to come back and visit 🙂
Happy weaving 🙂
For more creative craft, DIY and decor ideas from around the web, check out The Family Joy Blog Link Party.


Leave a Reply