• Skip to primary navigation
  • Skip to main content
  • Skip to primary sidebar
  • Secondary Navigation Social Media Icons

    • Etsy
    • Facebook
    • Instagram
    • Pinterest
    • Twitter
    • YouTube

A Pretty Fix

create. decorate. prettify.

  • Create
    • All Crafts
    • Fibre Crafts
    • Weaving
    • Punch Needle
    • Macrame
    • Wreathmaking
  • Decorate
    • Room Reveals
    • Decor Finds
    • Simple Decorating Tips
    • Home Organization
    • Healthy Home
    • Seasonal
      • Spring
      • Summer
      • Fall
      • Christmas
  • Shop
    • Shop My Home
    • My Amazon Favourites
      • Canada Site
      • US Site
    • My Etsy Shop
    • My Weaving Tools & Supplies
  • Popular Posts
  • Slow(er) Living
    • Slow Living Stories
  • About
    • Work With Me
    • Disclosure
    • Privacy Policy
    • Comment Policy
    • Copyright

DIY Cubby Wall Display

Sep. 07, 2015

This beautiful, easy DIY cubby wall art display is a great solution to fill an empty half wall or any wall for that matter. A beautiful way to display treasured objects in your home.When we first moved into our home five years ago, I had every intention of doing something with this half wall.

empty half wall

It is quite long (9 feet!) and, as you can imagine, takes up a lot of visual space. Unlike any other wall in our home, it does not anchor a room in any way. It simply separates the staircase leading to the basement. It is also located in a part of the home transitioning guests from the front foyer to the great room.

half wall
The view from our great room into the front hall foyer. Our dearest cat Alexander (RIP), and brother to Napoleon, guards the hall.

Over the next five years, it drove me a little ‘batty’ at times as it’s been the most challenging design dilemma to solve in my home. During this time, my husband often caught me staring at the wall, transfixed by it, as I tried to figure out just what I could do with it. I’d spent several hours imagining all the possibilities, and came up short. Scouring the internet was not helpful either. Whenever I googled what others did with their half walls, suggestions involved either painting the wall – which only highlighted the problem (!) – or putting a piece of furniture against it – which did not work in this transitional space. Others recommended placing decorative objects on top, which only posed a safety hazard for us. I had visions of my husband or me being clocked on the head with a ceramic vase!

At one time, I did try placing a narrow bookcase and then a buffet against it, but in both cases they appeared random and out of place, not to mention that they took away from the airy, open transition into our great room.

living room - aprettyfix.com

After these failed efforts, I decided that the best option was simply to decorate the wall. This would address two issues. First, it would provide visual interest to a very long, blank space. Second, the transition from foyer to great room would remain open and in keeping with the open-concept layout of the home.

So, what was my inspiration? After leafing through a home style magazine, I came across a photograph of inexpensive cubbies being used to store mail and keys. At this point, it just clicked for me.  Cubbies are incredibly versatile, so why not use them in a series to create a wall display? And that’s just what I did.

The following tutorial shows you how I created my DIY cubby wall display:

Phase 1: Hanging the cubbies.

Materials used:

  • 10 cubbies (in 3 different sizes)
  • Screws + plastic screw anchors
  • Drill
  • Screw driver
  • Rubber mallet

cubby wall display, materials

The Steps

Step #1: Determine a design

I purchased four packs of cubbies; each came with 3 cubbies and cost $10 per package. I decided to hang each threesome together, at different heights. I then wanted that pattern to repeat for the next threesome, and then the next threesome along the wall. This meant that I would have 3 groupings of 3 cubbies to span the length of the wall. I left some space at the end to add one more cubby. This way I ended up with the largest cubby on the far left of the wall and also on the far right, thus anchoring the installation.

Step #2: Measure, measure, measure

Measuring the spacing of the cubbies was the next step. In order to do this, I traced each cubby onto paper, cut each piece and hung it on the wall. (Below, you can see 3 groupings of 3 cubbies, plus one on the far right. Some of the paper was starting to unfold, but you get the idea).

This beautiful, easy DIY cubby wall art display is a great solution to fill an empty half wall or any wall for that matter. A beautiful way to display treasured objects in your home.

Step #3: Number each cubby

Next, I numbered each cubby in the exact order in which they would be hung. The reason for this is that each cubby’s holes on the back side – where the screws would hold the cubby up once hung – were not placed at the exact same height from the top of the cubby. In fact, some holes were a little higher, others a little lower – these were inexpensive cubbies, so it was to be expected.

I measured the placement of the screws on the wall based on each cubby’s peculiar placement of holes.

This beautiful, easy DIY cubby wall art display is a great solution to fill an empty half wall or any wall for that matter. A beautiful way to display treasured objects in your home.

That being said, with a long wall of cubbies placed at various heights, if any cubbies were off by a few millimetres here and there, it would not have an impact on the overall look of the display.

Step #4 Time to drill holes in the wall!

I had my husband drill holes in the wall, after which I inserted the plastic screw anchors into each hole:

This beautiful, easy DIY cubby wall art display is a great solution to fill an empty half wall or any wall for that matter. A beautiful way to display treasured objects in your home.

Taking the rubber mallet, I hammered each anchor into the wall, and then screwed each screw into the plastic anchors, ensuring that I left a bit hanging out (about a quarter of an inch) so that the wall cubbies could be hung.

This beautiful, easy DIY cubby wall art display is a great solution to fill an empty half wall or any wall for that matter. A beautiful way to display treasured objects in your home.

Step #5 Hang each cubby in the order you had predetermined earlier.

Now it was time to hang the cubbies into place.

hang cubbies - aprettyfix.com

Now…wait several months 😉 before coming up with an artful way of displaying objects. With a cubby wall display like this, the sky’s the limit – which, in part, explains why it took me a while. The design I finally came up with allows me to change out items while playing with colour, all at a very low cost.

What I decided to do was to use colourful craft paper inserts glued on cardboard. With craft paper inserted into the cubbies, I can change out the colour whenever the mood (or season or holiday) strikes.

To create your own inserts, follow along with these simple instructions.

Step #1

Trace paper to fit the interior of each cubby.

measure craft paper insert

Cut along the traced outlines created on your craft paper.

cut along the outlines.

In order to make the craft paper inserts sturdy and solid, use cardboard backing. Just trace the cardboard to fit each cubby as  you did the craft paper, like so…

trace cardboard inserts

…and then glue the craft paper to each cardboard cut-out:

glue craft paper onto each cardboard insert.

craft paper and cardboard glued together.

Now you are ready to insert your panels into each cubby.

insert back panel into cubbies.

And voila! You have a cubby art wall installation lined with pretty craft paper ready to display treasured objects.

This beautiful, easy DIY cubby wall art display is a great solution to fill an empty half wall or any wall for that matter. A beautiful way to display treasured objects in your home.

This beautiful, easy DIY cubby wall art display is a great solution to fill an empty half wall or any wall for that matter. A beautiful way to display treasured objects in your home.

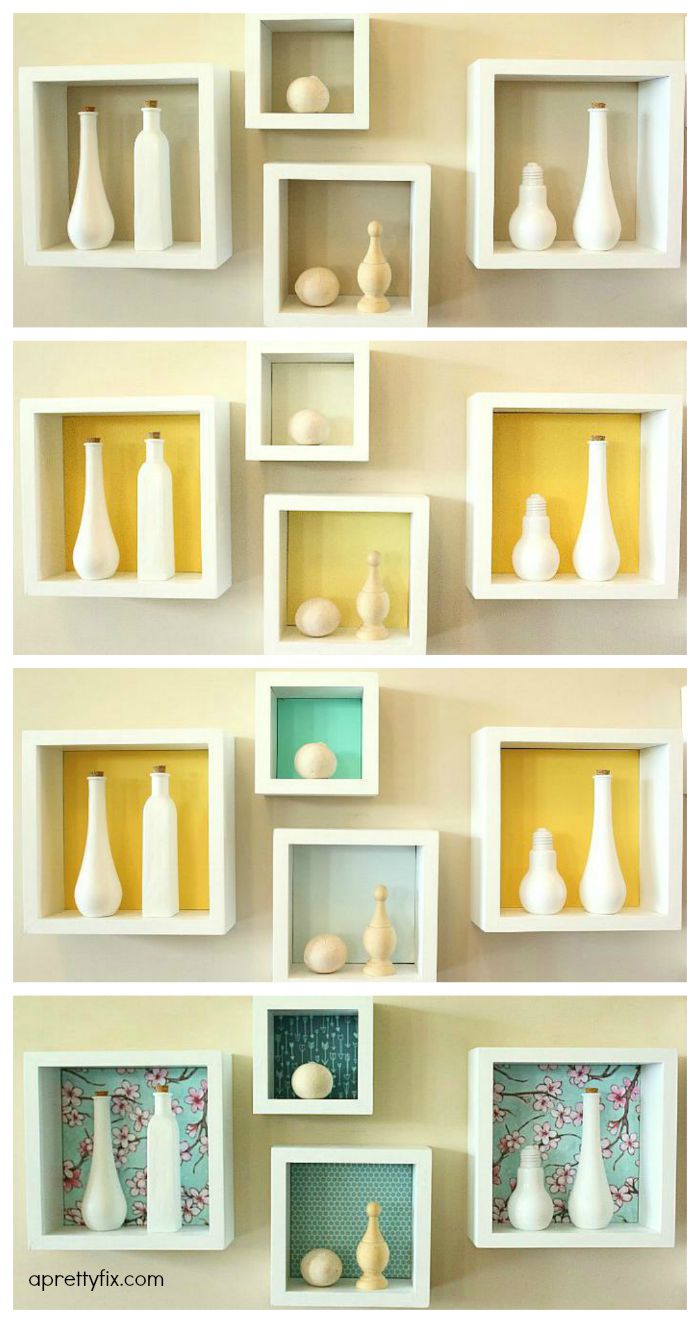
The objects I chose to display are neutral in tones of white and unfinished wood pieces found at my local craft store. All the white objects you see were simply glass bottles that I spray painted in a semi-gloss white.

To appreciate just how versatile this wall display can be, I created 4 different looks just by changing out the craft paper inserts:

Look #1: Pretty in Turquoise

This beautiful, easy DIY cubby wall art display is a great solution to fill an empty half wall or any wall for that matter. A beautiful way to display treasured objects in your home.

This beautiful, easy DIY cubby wall art display is a great solution to fill an empty half wall or any wall for that matter. A beautiful way to display treasured objects in your home.

This beautiful, easy DIY cubby wall art display is a great solution to fill an empty half wall or any wall for that matter. A beautiful way to display treasured objects in your home.

This beautiful, easy DIY cubby wall art display is a great solution to fill an empty half wall or any wall for that matter. A beautiful way to display treasured objects in your home.

This beautiful, easy DIY cubby wall art display is a great solution to fill an empty half wall or any wall for that matter. A beautiful way to display treasured objects in your home.

Look #2:  Sweet & Cheeful Yellow

This beautiful, easy DIY cubby wall art display is a great solution to fill an empty half wall or any wall for that matter. A beautiful way to display treasured objects in your home.

This beautiful, easy DIY cubby wall art display is a great solution to fill an empty half wall or any wall for that matter. A beautiful way to display treasured objects in your home.

This beautiful, easy DIY cubby wall art display is a great solution to fill an empty half wall or any wall for that matter. A beautiful way to display treasured objects in your home.

This beautiful, easy DIY cubby wall art display is a great solution to fill an empty half wall or any wall for that matter. A beautiful way to display treasured objects in your home.

This beautiful, easy DIY cubby wall art display is a great solution to fill an empty half wall or any wall for that matter. A beautiful way to display treasured objects in your home.

Look #3:  Pretty Pastels

This has quickly become one of my favourite looks of late.

This beautiful, easy DIY cubby wall art display is a great solution to fill an empty half wall or any wall for that matter. A beautiful way to display treasured objects in your home.

This beautiful, easy DIY cubby wall art display is a great solution to fill an empty half wall or any wall for that matter. A beautiful way to display treasured objects in your home.

This beautiful, easy DIY cubby wall art display is a great solution to fill an empty half wall or any wall for that matter. A beautiful way to display treasured objects in your home.

This beautiful, easy DIY cubby wall art display is a great solution to fill an empty half wall or any wall for that matter. A beautiful way to display treasured objects in your home.

This beautiful, easy DIY cubby wall art display is a great solution to fill an empty half wall or any wall for that matter. A beautiful way to display treasured objects in your home.

Look #4:  Au Naturale

For this look, all you have to do is remove the inserts for a beautiful, neutral wall display.

This beautiful, easy DIY cubby wall art display is a great solution to fill an empty half wall or any wall for that matter. A beautiful way to display treasured objects in your home.

This beautiful, easy DIY cubby wall art display is a great solution to fill an empty half wall or any wall for that matter. A beautiful way to display treasured objects in your home.

This beautiful, easy DIY cubby wall art display is a great solution to fill an empty half wall or any wall for that matter. A beautiful way to display treasured objects in your home.

This beautiful, easy DIY cubby wall art display is a great solution to fill an empty half wall or any wall for that matter. A beautiful way to display treasured objects in your home.

So there you have it! It took me a while to get here, but I finally resolved the problem I’d been having with my half wall. This DIY cubby wall display provides versatility without any colour commitment. I can change things out with the seasons simply by changing out the inserts or swapping out the objects. The possibilities are endless!

This beautiful, easy DIY cubby wall art display is a great solution to fill an empty half wall or any wall for that matter. A beautiful way to display treasured objects in your home.This is a great project if you are looking for a way to display those treasured objects you have been saving or simply to provide interest to a boring, blank wall. It’s also a nice alternative to framed photos or prints. Hope you give this one a try!

This beautiful, easy DIY cubby wall art display is a great solution to fill an empty half wall or any wall for that matter. A beautiful way to display treasured objects in your home.


——————————————————————

For more ideas for your walls, including cubbies, wall shelves and gallery wall ideas, don’t forget to follow me on Pinterest!


Category: DIY, home decor Tags: DIY

← Previous Post
Does Education Kill Creativity?
Next Post →
All-Natural, 2-Ingredient Brass Cleaner

You may also like

Struggling to remove art from professional metal framing? This easy DIY guide walks you through the safe, step-by-step process to dismantle professionally framed metal artwork without damage. Perfect for art lovers and DIY enthusiasts ready to reframe and refresh their favorite pieces. #DIYFraming #ProfessionalFraming #MetalFrame #ArtReframing #HomeDecorDIY #PictureFrameDIY #ArtLovers #WallArtIdeas #CreativeProjects #FrameRemoval
Reframing Art: How to Dismantle a Professionally Assembled Metal Art Frame
DIY guide to making an oversized easel for a large frame loom for weaving and other large scale crafts.
A General Guide to Building a Large DIY Easel for Frame Looms
How to make DIY rustic swag wall decor.
Quick & Easy DIY Rustic Swag

About Jelica

Hi, I’m Jelica — the creator behind A Pretty Fix. I started this blog to help you simplify, style, and stitch a cozy home – even if you’re short on time or don’t know where to start. Because creating a beautiful space shouldn’t be complicated — just beautifully simple.

Reader Interactions

Leave a Reply Cancel reply

Your email address will not be published. Required fields are marked *

Primary Sidebar

Hi, I’m Jelica — the creator behind A Pretty Fix!

I’m a wife, cat mama, proud homeowner, and lifelong lover of all things beautiful and handmade. I started this blog to help you simplify, style, and stitch a cozy home – even if you’re short on time or don’t know where to start.

Because creating a beautiful space shouldn’t be complicated — just beautifully simple.

Find me online

  • Etsy
  • Facebook
  • Instagram
  • Pinterest
  • Twitter
  • YouTube

Disclaimer

A Pretty Fix participates in the Amazon Services LLC Program, an affiliate advertising program designed to provide a means for this blog to earn fees by linking to Amazon.com and affiliated sites. Thanks for your support! See A Pretty Fix’s full Disclosure Policy and Privacy Policy for more.

Copyright © 2026 · A Pretty Fix

Lexi Theme by Code + Coconut

We are using cookies to give you the best experience on our website.

You can find out more about which cookies we are using or switch them off in .

Loading Comments...

    A Pretty Fix
    Powered by  GDPR Cookie Compliance
    Privacy Overview

    This website uses cookies so that we can provide you with the best user experience possible. Cookie information is stored in your browser and performs functions such as recognising you when you return to our website and helping our team to understand which sections of the website you find most interesting and useful.

    Strictly Necessary Cookies

    Strictly Necessary Cookie should be enabled at all times so that we can save your preferences for cookie settings.