• Skip to primary navigation
  • Skip to main content
  • Skip to primary sidebar
  • Secondary Navigation Social Media Icons

    • Etsy
    • Facebook
    • Instagram
    • Pinterest
    • Twitter
    • YouTube

A Pretty Fix

create. decorate. prettify.

  • Create
    • All Crafts
    • Fibre Crafts
    • Weaving
    • Punch Needle
    • Macrame
    • Wreathmaking
  • Decorate
    • Room Reveals
    • Decor Finds
    • Simple Decorating Tips
    • Home Organization
    • Healthy Home
    • Seasonal
      • Spring
      • Summer
      • Fall
      • Christmas
  • Shop
    • Shop My Home
    • My Amazon Favourites
      • Canada Site
      • US Site
    • My Etsy Shop
    • My Weaving Tools & Supplies
  • Popular Posts
  • Slow(er) Living
    • Slow Living Stories
  • About
    • Work With Me
    • Disclosure
    • Privacy Policy
    • Comment Policy
    • Copyright

Boot Tray Makeover

Aug. 31, 2015

This boot tray makeover is a great way to turn a ho-hum boot tray to a stylish spot for your footwear. It's all in the details!Sometimes, a ‘DIY/craft fail’ can and should be saved. That’s certainly how I felt about my little boot tray makeover. Let me explain how it all began…

I had long thought about elevating our simple, plastic boot tray into a sweet little spot in our mudroom on which to place wet and muddy footwear. Until last week, the tray was serviceable, but a little – okay, a LOT – dingy.

This boot tray makeover is a great way to turn a ho-hum boot tray to a stylish spot for your footwear. It's all in the details!

This boot tray makeover is a great way to turn a ho-hum boot tray to a stylish spot for your footwear. It's all in the details!

This boot tray makeover is a great way to turn a ho-hum boot tray to a stylish spot for your footwear. It's all in the details!

All it really needed was a good scrubbing, but I also wanted it to be, well, pretty too. And now that summer was drawing to a close, and as we started getting more wet and rainy days, I thought it was the perfect time to start thinking of small ways to spruce up the mudroom.

What started out as a simple little DIY project, however, turned into a craft-fail-turned-craft-disappointment-turned-I’m-gonna-make-this-work-gosh-darn-it (!) kind of project. ‘I’ve gotten this far,’ I thought… And quite simply, I was determined to make it work. Ever been there before?

In this post, I’ll show you how I arrived at the finished product – warts n’ all! So, if you’ve been itching to make a couple of small changes to your mudroom, and want to give this DIY project a try, then read on (and learn from my missteps along the way 😉 ).

Materials needed:

  • plastic boot tray
  • spray paint
  • acrylic paint
  • artist’s paint brush
  • Mod Podge (acrylic sealer)
  • painter’s tape
  • measuring tape & pencil
  • river stones

Step 1:

Wash your boot tray and let dry. Make sure it is thoroughly dry before moving onto the next step.

This boot tray makeover is a great way to turn a ho-hum boot tray to a stylish spot for your footwear. It's all in the details!

This boot tray makeover is a great way to turn a ho-hum boot tray to a stylish spot for your footwear. It's all in the details!

Step 2:

Spray paint your tray. For this project, I chose a good quality brand – Krylon – for indoor/outdoor projects that adhere to a variety of materials, including plastic. The colour was a beautiful almond, satin finish, as you see below:

This boot tray makeover is a great way to turn a ho-hum boot tray to a stylish spot for your footwear. It's all in the details!

The colour and finish gave the tray a brighter, fresher look. See the before (left) and after (right) below:

This boot tray makeover is a great way to turn a ho-hum boot tray to a stylish spot for your footwear. It's all in the details!

Step 3:

Measure out the striped pattern that will surround your boot tray. On my tray, each stripe measured approximately 4 inches along the longer sides of the tray and about 3 inches along the shorter sides.

This boot tray makeover is a great way to turn a ho-hum boot tray to a stylish spot for your footwear. It's all in the details!

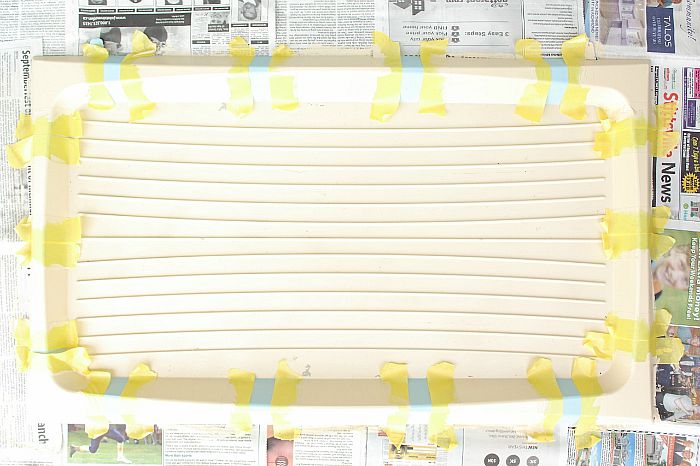
Once you’ve measured and marked off the stripes using a pencil, tape off the marked edges. For this project, the only hand painting to be done is the blue-green stripes, so make sure to place the tape where you will not  be painting.

This boot tray makeover is a great way to turn a ho-hum boot tray to a stylish spot for your footwear. It's all in the details!

Step 4:

Begin painting your coloured stripes with the acrylic craft or artist’s paint of your choice. Once you’ve finished, let dry – about 20 minutes.

This boot tray makeover is a great way to turn a ho-hum boot tray to a stylish spot for your footwear. It's all in the details!

Step 5:

Remove your tape…and cue scary, screeching movie music…

This boot tray makeover is a great way to turn a ho-hum boot tray to a stylish spot for your footwear. It's all in the details!

Yep, that’s how it turned. Argh! So, what went wrong? A couple of things likely contributed to this near-disaster:

  1. I waited too long – 24 hours – before removing the tape, allowing it to adhere to the paint.
  2. I failed to sand the plastic before painting, thus making it all-too-easy for the paint to come off. After reading a few articles on painting plastic, it seems not everyone agrees on this point. But given the results above, I would have to say that this was a crucial step for this particular project. For instructions on painting plastic, including the necessity of sanding, see this useful WikiHow article, ‘How to Paint on Plastic.’

Regardless of the results, I was still determined to save this little boot tray from total annihilation! While I was not willing to start from scratch, I decided to forge ahead; after all it is an inexpensive boot tray that could easily be replaced if need be. At this point, I focused on salvaging what I could.

Step 6:

Repaint! But only the almond-colour striping along the edges of the tray. At this point I applied tape to the blue-green stripes and started painting over the almond striping using acrylic paint (instead of spray paint). This way, I could avoid the possible overspray onto my freshly-painted blue-green stripes.

This boot tray makeover is a great way to turn a ho-hum boot tray to a stylish spot for your footwear. It's all in the details!

This boot tray makeover is a great way to turn a ho-hum boot tray to a stylish spot for your footwear. It's all in the details!

Step 7:

Remove tape after the acrylic paint has dried – approximately 20 minutes or a little longer.

This boot tray makeover is a great way to turn a ho-hum boot tray to a stylish spot for your footwear. It's all in the details!

Apply mod podge acrylic spray sealer according to instructions on the can. This will prevent the acrylic from running or staining when the tray gets wet.

This boot tray makeover is a great way to turn a ho-hum boot tray to a stylish spot for your footwear. It's all in the details!

Step 8:

Now – finally! – time to add river stones to the boot tray. The river stones are both pretty and useful – they’re a great way to add some rustic charm and allow water from your footwear to drain to the bottom without showing through. And when need be, all you have to do is remove the stones to give the tray a good wash.

This boot tray makeover is a great way to turn a ho-hum boot tray to a stylish spot for your footwear. It's all in the details!

This boot tray makeover is a great way to turn a ho-hum boot tray to a stylish spot for your footwear. It's all in the details!

And viola! A pretty little boot tray for the mudroom is born 🙂

This boot tray makeover is a great way to turn a ho-hum boot tray to a stylish spot for your footwear. It's all in the details!

This boot tray makeover is a great way to turn a ho-hum boot tray to a stylish spot for your footwear. It's all in the details!

This boot tray makeover is a great way to turn a ho-hum boot tray to a stylish spot for your footwear. It's all in the details!

This boot tray makeover is a great way to turn a ho-hum boot tray to a stylish spot for your footwear. It's all in the details!

This boot tray makeover is a great way to turn a ho-hum boot tray to a stylish spot for your footwear. It's all in the details!

This boot tray makeover is a great way to turn a ho-hum boot tray to a stylish spot for your footwear. It's all in the details!

This boot tray makeover is a great way to turn a ho-hum boot tray into a stylish spot for your footwear. It's all in the details!

This boot tray makeover is a great way to turn a ho-hum boot tray to a stylish spot for your footwear. It's all in the details!

Well, it took a bit of doing, but it’s finally done and I am very happy with the result (insert sigh of relief). In spite of a couple of missteps along the way, I am very glad I decided to stick it out and salvage my little boot tray makeover project 🙂 It was well worth the effort and definitely adds a bit of ‘pretty’ to our little mudroom.

For more mudroom ideas, don’t forget to follow me on Pinterest!

Follow Jelica @ A Pretty Fix’s board mudrooms on Pinterest.


Category: DIY Tags: diy weekend projects, home decor

← Previous Post
15 No-Knit Yarn Crafts
Next Post →
Does Education Kill Creativity?

You may also like

Looking for easy spring entryway ideas? This foyer refresh uses soft colours, fresh tulips, and layered textures for a subtle seasonal update without buying new decor. #SpringEntryway #FoyerDecor #SpringDecorating #SimpleHomeStyle #MinimalHome #DecorOnABudget #UseWhatYouHave #HomeStyling #NeutralDecor #CozyEntryway
Spring Foyer Decorating Ideas: A Simple & Minimal Refresh
My 21 Favourite Amazon Home Decor Finds, Room by Room (PLUS Alternatives If You Like to Shop Around)
A handmade rug mug in earth tones under a brown and cream cup of tea - one of many everday objects that double as decor. #FunctionalDecor #EverydayAesthetic #HomeStyling #DesignDetails #LiveableSpaces #StyledLiving #IntentionalHome #DecorWithPurpose #CozyCorners #EffortlessStyle
Quiet Decor: How We Use Everyday Objects as Home Decor

About Jelica

Hi, I’m Jelica — the creator behind A Pretty Fix. I started this blog to help you simplify, style, and stitch a cozy home – even if you’re short on time or don’t know where to start. Because creating a beautiful space shouldn’t be complicated — just beautifully simple.

Reader Interactions

Leave a Reply Cancel reply

Your email address will not be published. Required fields are marked *

Primary Sidebar

Hi, I’m Jelica — the creator behind A Pretty Fix!

I’m a wife, cat mama, proud homeowner, and lifelong lover of all things beautiful and handmade. I started this blog to help you simplify, style, and stitch a cozy home – even if you’re short on time or don’t know where to start.

Because creating a beautiful space shouldn’t be complicated — just beautifully simple.

Find me online

  • Etsy
  • Facebook
  • Instagram
  • Pinterest
  • Twitter
  • YouTube

Disclaimer

A Pretty Fix participates in the Amazon Services LLC Program, an affiliate advertising program designed to provide a means for this blog to earn fees by linking to Amazon.com and affiliated sites. Thanks for your support! See A Pretty Fix’s full Disclosure Policy and Privacy Policy for more.

Copyright © 2026 · A Pretty Fix

Lexi Theme by Code + Coconut

We are using cookies to give you the best experience on our website.

You can find out more about which cookies we are using or switch them off in .

Loading Comments...

    A Pretty Fix
    Powered by  GDPR Cookie Compliance
    Privacy Overview

    This website uses cookies so that we can provide you with the best user experience possible. Cookie information is stored in your browser and performs functions such as recognising you when you return to our website and helping our team to understand which sections of the website you find most interesting and useful.

    Strictly Necessary Cookies

    Strictly Necessary Cookie should be enabled at all times so that we can save your preferences for cookie settings.